Saturday, April 17, 2010

Unassisted Pregnancy and Home Birth of Caleb Simon


What a special time this was!
I want to share just a few minutes of this pregnancy and birth to hopefully show others that in most cases pregnancy and birth are safe and beautiful to experience! We didn't take unassisted birth lightly, but did lots of homework and weighed many options before we came to this decision. Above all else, we wanted to trust God with the decision we felt was right - the one He had placed on my heart months before I was even pregnant. I am so thankful for this experience, and that I have a husband that was just as committed to it as I was. Tim was there for me in every way! Thank you, I love you!!
I also wanted Tim to add what he enjoyed or took away from this pregnancy and birth that maybe didn't happen in our first 2 births at the hospital.

I really, really, really (can I add more "really"s?) loved this birth experience! It was a night and day difference from the other two. I can't really think of much that was even similar, except that a baby came out. This time was so peaceful, and just felt like it was a very normal, right thing to do. I guess we had prepared our minds for it for a long time, and Rebekah kept filling me in on all of the research she was doing, so when it came time to actually do it, it almost seemed like we had already done it before, so there was nothing to it. She was very calm and in-control about the whole thing, too, so that obviously helped a lot. I must say again that I am married to the awesomest woman on the planet! I guess it really just came down to, do we really want what's best for the baby and for Rebekah, or do we just want to do what feels safe and convenient? Anyway, enough of all that. I'll stop before a sermon breaks out.. :o)
No doctors, no people running around, peace and quiet, and all in the comfort of our own home - what more could anyone ask for?

(Sorry about the weird squeal at the end.. It's not in the original, but I can't get it off of this one... :o( )


I would love to answer any questions I am able. Just leave a comment and I'll comment back. I know that unassisted birth is not for everyone but it was for us so please keep all comment positive :o)

Wednesday, April 14, 2010

Josiah's Birthday


Wow, what a day!!!
Talk about bugs everywhere.


The night before, I decided that I should probably make Josiah's presents. I found this really big onesie  that I cut up, and a few other scraps for a bug shirt.


I think it turned out pretty cute!
I like the bug-eyed button eyes :o)


A few more scraps made the 2 bugs on a log pillow.


They have eyes and a little detail, but you can't see it that well in this picture.


I baked the cake the night before, but did this the day of the party. Good thing the party was at 4 pm.
Here's the cake carved.


And with 2 coats of icing.


Tim was so great and found me brown chocolate twizzlers for the legs and york peppermints for the eyes.


A little icing was a big help to keep the legs from falling down.


There were plastic bugs on the table, but most of them got grabbed before the party started :o)


I'm really helping Samuel out of his chair, not squeezing his arm to death.
Josiah was so cute trying to blow out his candles! It took a little help, but he did it.


Bugs.


More bugs.


Balls.


And what every boy need... a big LOUD drum :o) Thanks Uncle J.D. and Aunt Meg!!


Samuel loves catching himself with Josiah's bug net. 


Here's Josiah's buddy Kenny enjoying his piece of bug.


I think Josiah only ate ice cream and left the cake. Oh well.


It was a great day with lots of family!

Place Mats To Pillow


The other night I was putting away some laundry when I saw these two place mats stuck way in the back of a drawer. I pulled them out and thought they would make a beautiful, and very fast pillow. They were perfect with the scalloped edges, and a different fabric on each side!


I knew it would be a fast sew, but it only took like 3 minutes!!!


I pinned them together and followed the seam that was already there, leaving a few inches open on one side for stuffing.


Then stuffed, and sewed the opening closed. Seriously, 3 MINUTES!!! 


Now why didn't I think of this before? It's my new favorite thing in my room :o)


I'm linked here


Monday, April 12, 2010

Babywearing Part 2


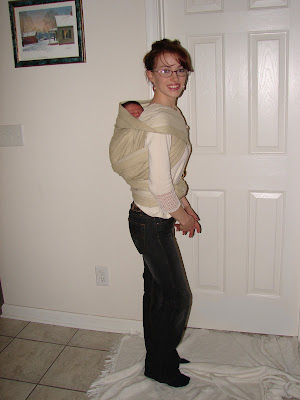
For this back wrap, start off by kneeling on a soft surface and using a mirror and/or another person to help while you're learning. Hold the newborn under his armpits with one hand so that his head falls forward onto your hand for support. Have your wrap ready and spread out behind you so as soon as the baby is in place all you have to do is pull the wrap up over them.


Gently lift them over your shoulder and place them in the middle of your back.


Pick up the top rail of your wrap and bring it up to the top of your baby's neck.


Bring both tails of your wrap up over your shoulders, making sure that the bottom of the wrap is tucked under your baby's bottom, and for new little ones tuck it under their feet too.


Cross the tails over your chest. To help keep everything snug you can hold one tail of the wrap in between your knees while crossing the other one around your back.


Here's one side crossed around my back and over the baby.


And two sides. This makes an "x," just like the front wrap I showed before. For this tiny one I didn't go through the legs, but for babies a little bit older, or when using a thinner fabric, I cross through the legs. With both sides of the wrap in front, now just tie or tuck your wrap to secure, and you're done!


I checked in a mirror to see what side his head was facing and turned that side of the wrap down on my shoulder, so we can see his cute little face, and to make sure that there's plenty of room for him to breathe.


Now I'm ready for whatever needs done. This back wrap is so great when you have other children to run after, and for doing things that require you getting close, like reaching down into a washing machine. My day is so much easier when I have happy babies, and am also able to have them out of my way so I can still take care of things.


Now, to get them down, just kneel back on a soft surface again and untie your wrap. 


Pull everything off of both of you.


And let them slide down into your hands.


All that, and he's still asleep :o) It's great working with newborns!


Now one more front carry. The great thing about this wrap is that you can put it on and leave it all day. By tying it on first, you can put your baby in and take them out without having to tie and untie your wrap again and again. It's great for days when you're in and out of the car a lot. Start just like the front wrap cross. 
Around the front...


And crossed in the back up over your shoulders.


But this time cross the tails and put them inside the pocket. Leave it loose enough to get your baby in the wrap. You may need to try a time or two before you get the hang of how much room to leave. This will be different, of course, depending on your baby's size and the type of fabric your wrap is made out of.


Tie in back.


Find the inside cross of the "x" (to make spreading the wrap out easier) and put your baby's bottom in.


Then spread out the outside cross of the "x" over your baby's back and head.


Now just pull up the pocket and you're very secure with a newborn, or any sleeping or nursing baby.


To get your baby out, just pull the pocket down and open the outside and then the inside of the x and lift your baby out. Everything is still right where it needs to be, so you can put them right back in whenever you need to. It's so easy with just a tiny bit of practice. Once you get the basic concept that there is always a pocket or an "x" or both somewhere in the wrapping, it's really easy to adapt to the variations. 

I Ruffled My Kitchen UPDATE


I just added some pictures of the curtain and rug in my kitchen! Click HERE to see the updated post.

Thursday, April 1, 2010

A Bug Party In The Making


Josiah's turning 2!!!!!!!
2 years go by so fast. He's such a big boy now. And he LOVES bugs! So we're having a bug party. I've had so many ideas bouncing around in my head as to what I will actually do for his party. I'm still not quite sure, but it's coming together. And, just like Samuel's party, I still have a few more days :o)
So far the only thing I have ready is this bean bag game that I'm hoping will help him not have to go sit in his bed so much for throwing things that he shouldn't. My thought is that if there is something that is ok to throw he will do that instead of throwing toys and hitting his brothers with them :o) I guess time will tell if this theory is true. I made 10 bags, so that was enough for his name and 4 more with the #2.


 I want to take a pillow we already have and turn it into a bug pillow, because he doesn't have a pillow right now. I haven't really thought about it before because Samuel has never wanted to use a pillow, so we just didn't give Josiah one either. But I think if it's a bed bug pillow he would be more than happy to use it. I've tried to think of things that can go along with toys we already have, to go along with what's there, and not have a bunch of new stuff to take up all the room that we don't have. Like this car carrier that I love, and will make, even if not for his birthday. Also, I want to make some kind of ABC book or magnet game - maybe with some kind of container like this one. I'm not sure what supplies I have on hand to work with yet.
I'll find that out at nap time :o) I have a bug cake idea coming together in my head that HAS to get down on paper today so I'll be ready to bake tomorrow. I'll have more to update soon. I hope to have a bug cake that looks as good as Samuel's dragon cake did ;o)